Sunday, December 1, 2013

Coral and Aran Crochet Blanket

The cold winter winds are starting to blow and the temperature has finally stopped bouncing back up to the high 70's.  This couldn't have been a better time for me to FINALLY finish this blanket for a friend.  It took me about 63 hours to complete, but because of wrist problems, laziness, and my knack for having way to many arts and crafts projects going on all at once, those 63 hours were stretched out over almost a year and half!

I used the V Stitch Puff Crochet Stitch that I found on NewStitchADay.com.  The two colors are Coral and Aran from the Red Heart brand of worsted yarn.  I had actually used this stitch to make a different blanket for my sister as a Christmas gift a couple of years ago.  She has said that it is very warm, and cozy.


Tuesday, November 26, 2013

Painted Glass Serving Trays


This project created a couple of different serving trays that we were able to combine and rearrange to make various styles of trays.  We bought a couple of clear glass serving trays at a thrift shop, along with some decorative beaded edging and a few glass candlestick holders.  We also stuck with our decorating theme for this Thanksgiving by using gold and copper metallic spray paint and extra fine glitter, spray adhesive and clear acrylic spray paint, and a hot glue gun.


First, we sprayed the bottom of the glass trays and the candlestick holders with either gold or copper metallic spray paint.  We did not spray the top of the trays because we didn't want the paint to chip and get into any of the food we will be serving.  Plus, the ridges and designs on the bottom of the glass plates made a really amazing looking tray when viewed through the unpainted top side of the trays!

Next, we sprayed the candlestick holders with spray adhesive and coated them with either gold or copper colored extra fine glitter.  We then applied a couple of coats of clear acrylic spray paint over the glitter so that it wouldn't fall off all over the place.  Nobody wants glitter covered food for Thanksgiving!

Now we mixed and matched our different trays so that some of the trays would be tiered.  To add a little security to the elevated trays, we used a hot glue gun to adhere the candlestick holders to the bottom of the trays.  We also used the hot glue gun to apply the beaded trim to the bottom of one of the trays.  After wiping down and cleaning the trays we are ready to serve up some yummy Thanksgiving snacks on our new decorative serving trays!


Monday, November 25, 2013

Mixed Beans Candle Holders

This a really easy way to make a cute, natural looking candle holder.  We started with a plain large vase (and a similar smaller vase) and layered in dry beans, barley, and lentils.  Then we popped a tea candle right down into the beans, pressing it in only enough so the top of the candle was level with the beans.  In the taller vase, we used a stick candle, sticking it far enough into the beans so that it wouldn't fall over.


You could stop there, but we wanted to step it up just a little bit more.  We wrapped some raffia around the base of a feather and the end of a small gold leaf applique.  Then we simply tied it around the outside of the vase.  Viola!  A pretty candle holder for Thanksgiving.

Sunday, November 24, 2013

All that Glitters is Gold...Candles!

We are getting into the Thanksgiving decorating spirit (and not jumping right to Christmas...hate that!).  Our first project was really simple and easy: make plain candles prettier!  We used plain stick candles, metallic spray paint, spray adhesive, extra fine glitter, clear gloss acrylic spray paint and a wire hanger.


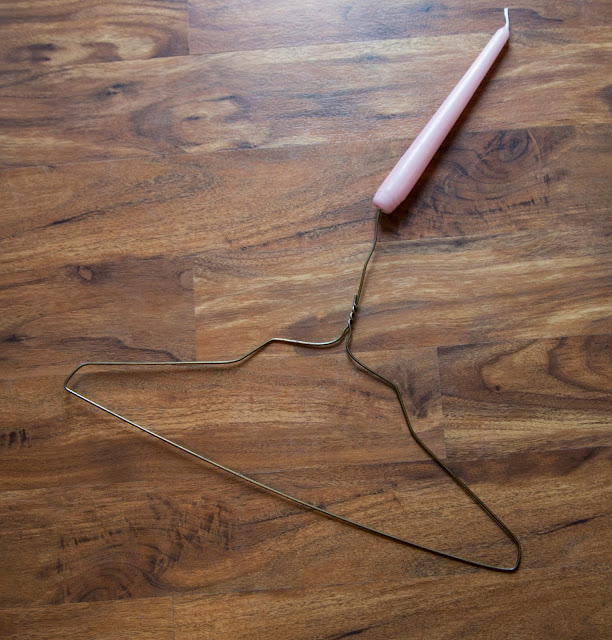
Since we wanted the candles to be evenly coated, we first straighten the hook of the wire hanger and then jammed it into the bottom of the candle.  Make sure you apply a good amount of pressure but don't try to get crazy because you don't want to bust up the base of your candle.  Now you can hang or hold your candle so that you won't have to set it down and only work on one side at a time.


The rest is pretty simple.  First spray the entire candle with the metallic spray paint by following the directions on the spray paint can.  You may even want to give it two coats.  After it is dry, spray the candle with the spray adhesive, once again following the directions on the can.  Sprinkle the extra fine glitter over the adhesive and allow that to set until completely dry.  Finally, spray the entire candle with the clear acrylic.  You may want to apply a few coats of the spray acrylic so that the glitter is really covered well and won't fall off every time you move it.  

We made these candles to use as a decoration and we have no intention of burning them.  Typically, you shouldn't burn things that have been covered in paint, glue, and glitter, so we don't recommend doing this project on candles you are going to burn unless you are working with products that are meant to be set on fire. 

Friday, November 8, 2013

Lighting Test In The Studio


These photos were taken in and around the studio.  The first two were used with either two or three studio lights.  We moved the lights around until we felt the model (me) was lit correctly.  This can be a time consuming process so playing with the lights in our spare time will help us save time when with a client. 


For the next photo we turned off the lights and used the nature light that was coming through the nearly floor to ceiling windows.  The lighting effect is much softer than the studio lights.


The next photos were taken outside, but we used an off camera flash set up in a beauty dish to add extra highlights.


If you would like to book a shoot with Sara or see more of her photography, please visit the Bellawillow website.


Thursday, November 7, 2013

Lighting Test In The Forest


 We have been testing out different ways to light our photos.  For the following photos we used an off-camera flash that was set up in a beauty dish with a diffusing cover.  We hiked out into the forest and shot between 5-7 as the sun was going down.


If you would like to book a shoot with Sara or see more of her photography, please visit the Bellawillow website.


Tuesday, November 5, 2013

Senior Pictures, Part 3

For our final shoot with Kelly we took her back outside so we could get some pictures of her in her Letterman's jacket.


If you would like to book a shoot with Sara or see more of her photography, please visit the Bellawillow website.

Monday, November 4, 2013

Senior Pictures, Part 2

Kelly is a member of her high school band.  We took some in-studio senior pictures of her with her clarinet and saxophone.


If you would like to book a shoot with Sara or see more of her photography, please visit the Bellawillow website.

Sunday, November 3, 2013

Senior Pictures, Part 1

Sara's cousin, Kelly, needed some simple senior pictures.  Here are a few that we had taken around town during the summer.


Kelly and her little sister.  Such a cute picture!

If you would like to book a shoot with Sara or see more of her photography, please visit the Bellawillow website.

Wednesday, October 30, 2013

Halloween Photography Experiments, Part 3

For our final Halloween shoot we wanted to do something other than ghost.  We had a great location and our friend Charles volunteered to be a werewolf.  We used an off camera flash to light the scenes from different angles.

Sometimes the universe gives you a really great location at just the right moment and you have to take advantage.  For this shoot we were able to go out into the woods to an old, rundown house.  This shoot would have been a lot less interesting if we had gone somewhere else.


To create the werewolf look I used regular costume make up around the eyes, first applying a layer of black and then using white and yellow to fade the black outward away from the eyes.  Our model had a five o'clock shadow and a very short haircut, so I used gum spirit to apply fake hair to his face and head.  I first applied black hair at the jawline and the top of his head.  Then I used a red/brown color to add highlight and fill in the hair around his cheeks and forehead.


Here are a few of Sara's finished pictures.

This lighting effect was actually created by the spotlight being placed directly under the models face. 


If you would like to book a shoot with Sara or see more of her photography, please visit the Bellawillow website.

Tuesday, October 29, 2013

Halloween Photography Experiments, Part 2

We got a couple of friends to help us out for our second Halloween photo shoot.  The idea for this shoot was to create old-time ghost photographs in a cemetery.  We had found the dresses at thrift stores, and spent minimal time on hair and make-up.  Again, we were playing with long exposure and we ditched a regular flash and used a spotlight while shooting under the moonlight.  This time I actually ended up hiding the spotlight under the fabric of my shirt because it was to bright when it hit the models' faces directly. 

This was a very clear and vibrant photo before I got a hold of it in Photoshop.  Because they are suppose to be ghost I ended up burning a lot of the shadows onto the models.  Then I used the desaturate tool over various parts of their skin and dresses, but I left some of their color because I felt like they looked more creepy that way.

This is another photo that used a long exposure.  We left the spotlight on just slightly longer than a second each time we turned it on (about 5-7 flashes). 

If a model moves too fast or the shutter doesn't stay open very long, one ghost image is achieved rather than large blur.  For this image the spotlight hit the scene very hard, but a very scary ghost image was created.
For the next two images Sara had changed the lens to a 50 mm and we used the flash instead of the spotlight.  This created better portraits of the models.  However, these clearer images didn't make for very good ghost pictures so I used Photoshop to burn the images and give the models a faded appearance over sections of their bodies.


When editing pictures, there is never a right or wrong way to edit.  Everyone has there own taste and style.  The following pictures are some of Sara's finished images.


If you would like to book a shoot with Sara or see more of her photography, please visit the Bellawillow website.

Monday, October 28, 2013

Halloween Photography Experiments, Part 1

This year we really got into Halloween photography.  It all started because I really wanted to do some creepy make-up and I wanted to see if I could apply costume prosthetic wounds.  Since my mom is a HUGE Halloween lover, she gladly volunteered to be a creepy ghost so that Sara and I could practice some ghostly photography tricks.

For this series of pictures we were in a dark room, blocking as much light as we could.  We experimented with different shutter speeds and various types of lighting.  Instead of using a flash, we used an LED spotlight that we covered with either a sheet of printer paper, white tissue paper, or a iridescent/translucent wrapping paper.

It may be a little obvious, but this photo has been Photoshopped a lot.  Sara took a great portrait, but I used the burn and dodge tools to exaggerate the shadows and highlight the fake blood.


This was an interesting shot.  Instead of using a flash, we turned off all the lights and used a spotlight that was covered by an iridescent/translucent wrapping paper.  The colors were created by the wrapping paper and the dark shadows were a result of using the spotlight instead of a flash.


For this shot Sara used a very slow shutter speed.  We had our model stand still for a few seconds with the spotlight on (but pointed to the ground).  Then we turned off the light and had the model begin walking across the room while the shutter on the camera was still open.  Every couple of seconds we turned the spotlight back on for literally a second, which is what created the ghost images as the model walked across the room.
Try some ghost pictures for yourself and let us know how they turn out!

If you would like to book a shoot with Sara or see more of her photography, please visit the Bellawillow website.