Sunday, March 23, 2014

Leather Crossbody

It has been a rather long time since we have posted anything, but we have been doing a ton of projects!  Hopefully we will get better at posting more frequently and to kick things off we are presenting a leather crossbody purse.


I can't pretend to be an expert at working with leather, or at making purses.  This was my first and I was pretty much just making it up as I went along.  If you happen to follow Amanda's Instagram (located in the right sidebar) you may have seen progression pictures of this purse as it was being made.

To start, I cut out a template of the size and shape I wanted the purse to be.  I actually took the major items out of the purse I was already using and I made sure that everything at least fit within the boarders of the template.  I also cut out a template for the pocket I wanted to attach to the front of the purse, and for the strap and two tabs that connect the strap to the body of the purse.  Next I traced the patterns from the templates and onto the leather, and then started cutting.

After cutting out all the pieces that would make up the purse, it was time to start adding the details.  Yes, the details come nearly first...not last!  I started with the pocket and tooled a bird sitting on a branch.  There are tons of videos on the Internet that can show you how to do leather tooling.  After the designs had been stamped out, I went over it with a leather dye.

Next, I lightly outlined where the pocket would be placed on the front of the purse.  This allowed me to see where I should place the tree design that I was going to be using as a secondary image at the sides of the pockets.  Since I'm still learning how to tool leather, I knew I wouldn't be able to make the small branch design that I wanted for the trees, so I used my wood burner instead.  

After all the design work was finished, I punched holes along the sides of the pocket and the sides of the body pieces of the purse.  I went around all the sides because I knew that I wanted to have a boarder around the top rim of the bag and the pocket.  To attach the pocket I used a little "V" stitch.  I'm not sure if there is a real name for this kind of stitch, but in my mind I thought it fit the style of the bag.  The rest of the bag was sewn together (by hand) using another stitch that I don't know the name of.  I'm sure that isn't very helpful at all, but I did mention that I was making this all up as I went.

The bag has a simple lining.  No pockets or anything on the inside.  I used rivets to attach the tabs onto the body of the bag and then got some simple hardware to attach the strap to the tabs.  The construction of this bag was all about keeping it simple and easy since it was the first purse I had ever made.  Also, I was sewing everything by hand so I tried not to create more work for myself that what was necessary.

I've been carrying this bag around for about a month and so far I love it.  It hasn't fallen apart and it holds all of my stuff.  The leather is beautiful and I feel very proud to tell people that I made the purse when they ask me about it.  There are a few imperfections, and I'm sure you can see them in the pictures.  I know I can see them when I look at the purse, but that is what makes it handmade and special.  Those are my little learning mistakes and as I continue to do more projects like this I will probably make more, but at least I'm making something awesome at the same time!


Wednesday, January 1, 2014

Family Christmas Pictures

We are a little late in posting these Christmas pictures, but better late than never!  As a gift to our friends we took pictures for them for the holidays.  The shoot was actually very simple, and we used the combination of natural light from a large window and one strobe light set about 6-8 feet back from where we had everyone positioned.  This allowed us to light everyone but also get a glow from the Christmas lights we used in some of the shots.

Tiffany and Charles are always willing to pose for pictures.  If you look closely, you may recognize Charles as our werewolf from one of our Halloween photo shoots!


Did you notice the little stocking in some of the other pictures?  Tiffany is pregnant so this was a combination of holiday and maternity pictures all in one!

When shooting with little kids, you sometimes have to change your ideas on the fly.  The little boy was DONE with pictures and was not going to smile anymore so we abandoned our original idea.  Little changes can still make great pictures so don't get discouraged when photo shoots don't go exactly as planned.
If you would like to book a shoot with Sara or see more of her photography, please visit the Bellawillow website.

Sunday, December 1, 2013

Coral and Aran Crochet Blanket

The cold winter winds are starting to blow and the temperature has finally stopped bouncing back up to the high 70's.  This couldn't have been a better time for me to FINALLY finish this blanket for a friend.  It took me about 63 hours to complete, but because of wrist problems, laziness, and my knack for having way to many arts and crafts projects going on all at once, those 63 hours were stretched out over almost a year and half!

I used the V Stitch Puff Crochet Stitch that I found on NewStitchADay.com.  The two colors are Coral and Aran from the Red Heart brand of worsted yarn.  I had actually used this stitch to make a different blanket for my sister as a Christmas gift a couple of years ago.  She has said that it is very warm, and cozy.


Tuesday, November 26, 2013

Painted Glass Serving Trays


This project created a couple of different serving trays that we were able to combine and rearrange to make various styles of trays.  We bought a couple of clear glass serving trays at a thrift shop, along with some decorative beaded edging and a few glass candlestick holders.  We also stuck with our decorating theme for this Thanksgiving by using gold and copper metallic spray paint and extra fine glitter, spray adhesive and clear acrylic spray paint, and a hot glue gun.


First, we sprayed the bottom of the glass trays and the candlestick holders with either gold or copper metallic spray paint.  We did not spray the top of the trays because we didn't want the paint to chip and get into any of the food we will be serving.  Plus, the ridges and designs on the bottom of the glass plates made a really amazing looking tray when viewed through the unpainted top side of the trays!

Next, we sprayed the candlestick holders with spray adhesive and coated them with either gold or copper colored extra fine glitter.  We then applied a couple of coats of clear acrylic spray paint over the glitter so that it wouldn't fall off all over the place.  Nobody wants glitter covered food for Thanksgiving!

Now we mixed and matched our different trays so that some of the trays would be tiered.  To add a little security to the elevated trays, we used a hot glue gun to adhere the candlestick holders to the bottom of the trays.  We also used the hot glue gun to apply the beaded trim to the bottom of one of the trays.  After wiping down and cleaning the trays we are ready to serve up some yummy Thanksgiving snacks on our new decorative serving trays!


Monday, November 25, 2013

Mixed Beans Candle Holders

This a really easy way to make a cute, natural looking candle holder.  We started with a plain large vase (and a similar smaller vase) and layered in dry beans, barley, and lentils.  Then we popped a tea candle right down into the beans, pressing it in only enough so the top of the candle was level with the beans.  In the taller vase, we used a stick candle, sticking it far enough into the beans so that it wouldn't fall over.


You could stop there, but we wanted to step it up just a little bit more.  We wrapped some raffia around the base of a feather and the end of a small gold leaf applique.  Then we simply tied it around the outside of the vase.  Viola!  A pretty candle holder for Thanksgiving.

Sunday, November 24, 2013

All that Glitters is Gold...Candles!

We are getting into the Thanksgiving decorating spirit (and not jumping right to Christmas...hate that!).  Our first project was really simple and easy: make plain candles prettier!  We used plain stick candles, metallic spray paint, spray adhesive, extra fine glitter, clear gloss acrylic spray paint and a wire hanger.


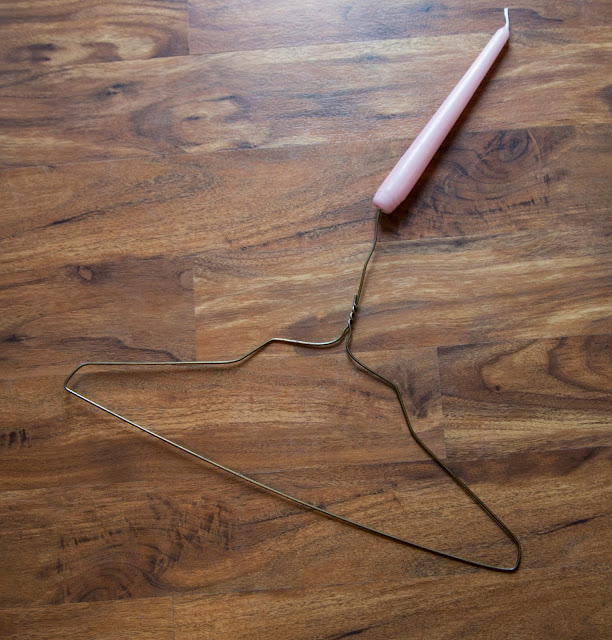
Since we wanted the candles to be evenly coated, we first straighten the hook of the wire hanger and then jammed it into the bottom of the candle.  Make sure you apply a good amount of pressure but don't try to get crazy because you don't want to bust up the base of your candle.  Now you can hang or hold your candle so that you won't have to set it down and only work on one side at a time.


The rest is pretty simple.  First spray the entire candle with the metallic spray paint by following the directions on the spray paint can.  You may even want to give it two coats.  After it is dry, spray the candle with the spray adhesive, once again following the directions on the can.  Sprinkle the extra fine glitter over the adhesive and allow that to set until completely dry.  Finally, spray the entire candle with the clear acrylic.  You may want to apply a few coats of the spray acrylic so that the glitter is really covered well and won't fall off every time you move it.  

We made these candles to use as a decoration and we have no intention of burning them.  Typically, you shouldn't burn things that have been covered in paint, glue, and glitter, so we don't recommend doing this project on candles you are going to burn unless you are working with products that are meant to be set on fire. 

Friday, November 8, 2013

Lighting Test In The Studio


These photos were taken in and around the studio.  The first two were used with either two or three studio lights.  We moved the lights around until we felt the model (me) was lit correctly.  This can be a time consuming process so playing with the lights in our spare time will help us save time when with a client. 


For the next photo we turned off the lights and used the nature light that was coming through the nearly floor to ceiling windows.  The lighting effect is much softer than the studio lights.


The next photos were taken outside, but we used an off camera flash set up in a beauty dish to add extra highlights.


If you would like to book a shoot with Sara or see more of her photography, please visit the Bellawillow website.